Content
If you'd like to know more about what exactly is a Custom Video Request, please see our article here: What is a Custom Video Request?
Intro
The Custom Video Request menu is possibly one of the most used features on RoscoLive as the ability to get any video you require from your cameras in the field is invaluable for fleet operation and management.
Since the custom video request allows for users to make requests for any date and time, there is a chance that no video will be returned in your request due to the SD card not currently containing any video files for the time requested.
The most common cases where this can occur are:
- Camera was off and/or not recording for the requested time
- Request date is too far back into the past so the video files were overwritten
- SD card was replaced / reformatted and doesn't contain the video files for that time
- SD card was missing from camera and unable to record for that time
Simple Custom Video Request
The Simple page in the Custom Video Request menu is a minimal experience with no frills about it, its there to do one job and that is send a Custom Video Request to your cameras for the date and time you set.
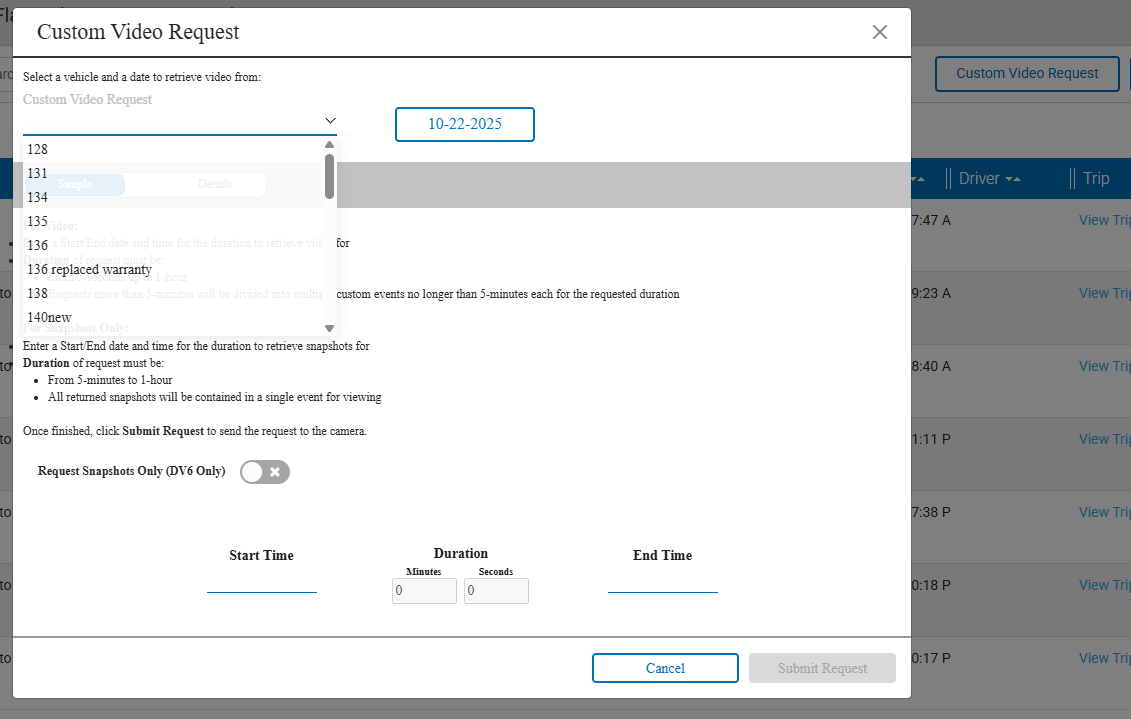
At the top is the tab-slider that you can click to change between the Simple and Details view for the custom video request.
All that is required for a custom video request is to select a vehicle (unless vehicle is already selected for you), change the date, enter a Start Time, and End Time. The duration of the request is displayed between the start and end time inputs. A duration for a request can be from a minimum of 5 seconds all the way up to 1 hour.
Requests for video duration longer than 5 minutes will be split into multiple custom video requests with video duration up to 5 minutes long for the full duration of the whole request duration.
ex: An 18 minute request would be split into four separate events: 3 5-minute videos and 1 3-minute video.
Details Custom Video Request
The Details page is where the available video on the SD card for the selected camera is displayed and available for viewing and exploration so you can see exactly when the camera was recording that day and how long in addition to being able to make a request using the video timeline.
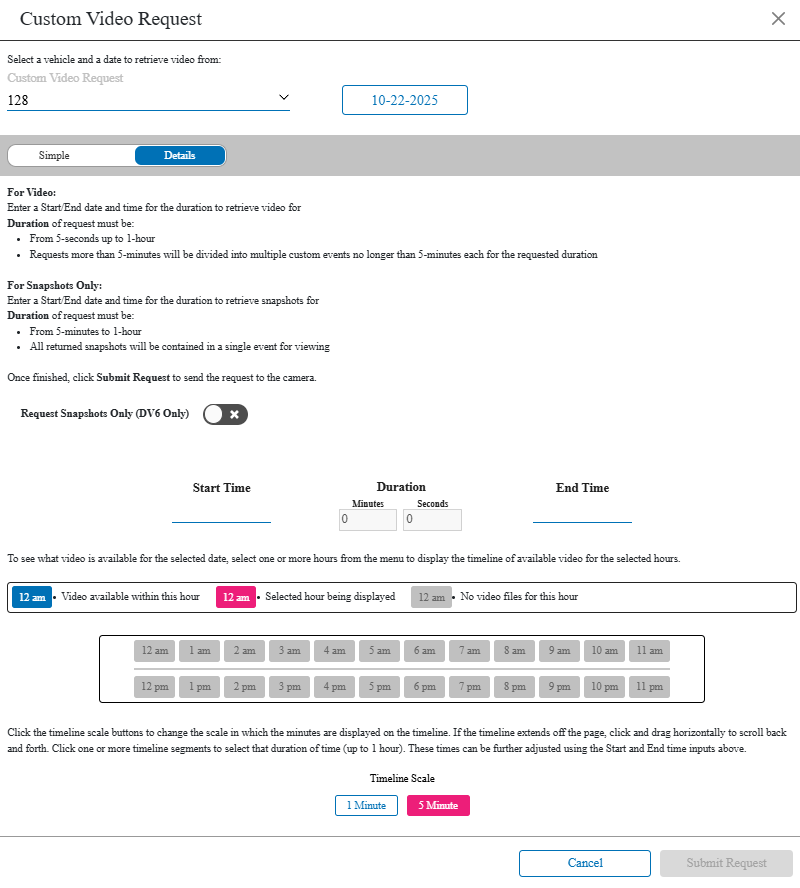
The top half of this page is exactly the same as the Simple page so we will skip that part to focus on the bottom half.
Video Availability Timeline
This part of the page contains the information for what video is available on the selected date for the selected camera. There are two pieces to it: Hour selection menu and timeline.
Hour Selection Menu
The first part of this is a grid of buttons that are labeled with the hours of the day. This menu represents hours in which the camera has video recordings available. The instruction and reference guide describe the meanings of each color and how to see the video timeline for the valid hours.
Using the legend as reference, we can see what the button colors represent:
- Blue - There are video files recorded during this hour and timeline is available for viewing
- Pink - A hour that is selected for viewing on the timeline
- Gray - An hour in which no video files are available on the camera
More than 1 hour button can be selected at a time to expand or narrow your search. When a button is clicked, the hour will be added to the timeline below for viewing. To remove from the timeline, simply click again and it will turn back to blue.
Video Timeline
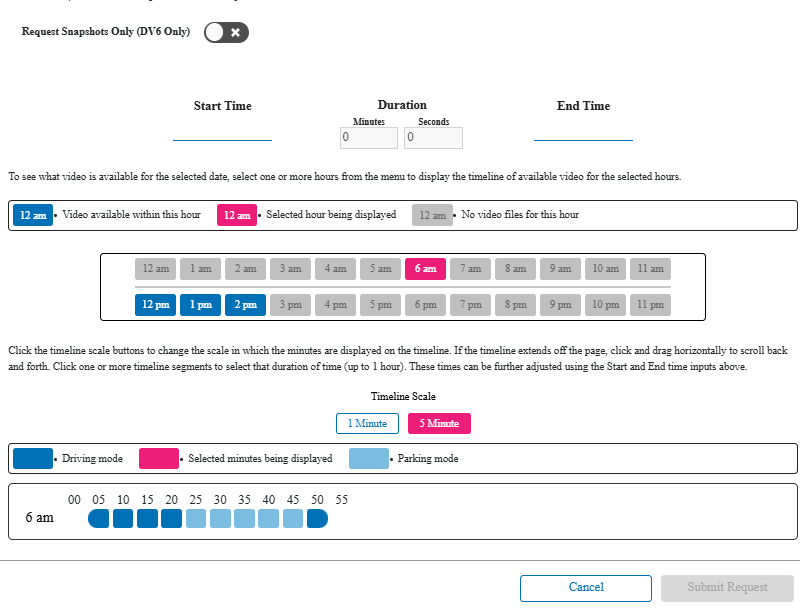
Underneath the hour selection menu is a timeline that displays what video is available in the selected hours. Initially, nothing is displayed because there are no hours selected. After selecting an hour to view, the timeline will display the available video for that hour. If the timeline is too big to fit on the page, you can use the scrollbar to simply scroll back and forth along the timeline to view. Another way to help expand or collapse the timeline view is to adjust the Timeline Scale.
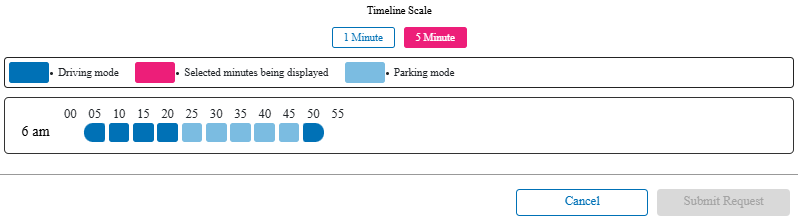
The Timeline Scale option controls the minute-scale increments for each hour. After selecting and viewing the time you want, you can then click on the square where you want the video to start and then click again at the time where you want the end time and this will select that duration of video for the request.
Note after making your selection, the squares turned the pink color to indicate they've been selected, and the Start / End times were automatically entered for you! From here you can go ahead and click Request Video to make this request - OR - if you require even more precision in your request, feel free to adjust the Start / End times to your liking and then make the request.
Something to take note of is the timeline blocks represent the full minute from x:00 to x:59 inclusively, so the End Time selected from the timeline will always be the beginning of the next minute to include the full selected minute.
Make The Request
After making your selection for what video to retrieve, click the Request Video button at the bottom of the menu to send the request.
If the duration you are requesting is longer than 5 minutes, you will see a menu appear informing you of the amount of video requests that will be made and ask you to confirm the request or to go back and change it.
After clicking the Request Video option, the request will be sent and this menu will appear asking if you'd like to make more requests. If Yes, it will close and bring you back to the Custom Video Request screen with all of the previous request settings still in place. Otherwise, it will close the Custom Video Request screen and bring you back to the main page where you opened the Custom Video Request.
View Custom Video
All Custom Video Requests after they are uploaded are then made available on the Events page for the date the video was recorded. There, they have all the options of a normal event - watch video, view snapshots, share, flag, download, leave note, and delete (Fleet Managers and above only). All custom video requests will display the type Custom Clip.
