Skip to content
English
  • There are no suggestions because the search field is empty.

Installer App Guide

Note: This guide walks you through the full installation process for a DV6 or DV7 camera using the Rosco Installer App. Before beginning the installation, please ensure the vehicle is parked in an area with a strong cellular signal.

1. Log In to the Installer App

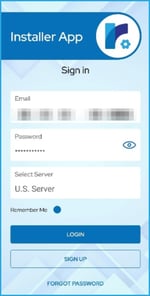
  • Download “Rosco Installer App” from the Google Play or Apple App store.
  • Open the Rosco Installer App on your mobile device.
  • Log in with your existing Rosco Installer credentials or create a new account if you're setting it up for the first time.
  • Choose your regional server (US).


          2. Enter Your Company Key

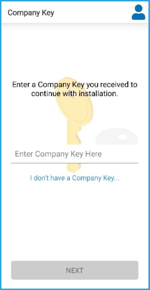
          • After logging in, you’ll be prompted to enter your Company Key. You can obtain this key from your manager, or by following the steps below on RoscoLive:
          • To locate your key on RoscoLive:
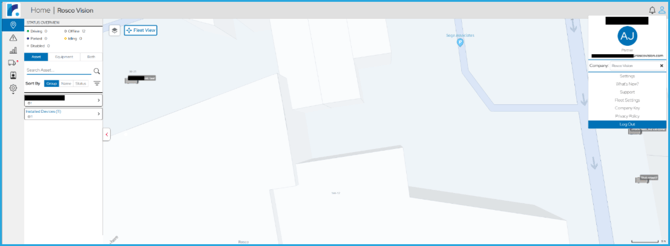
            • Log into RoscoLive
            • Click the user icon located in the top-right corner of the page
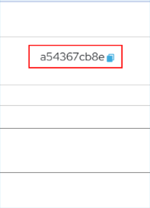
            • Select "Company Key" from the dropdown menu and copy/note the company key to apply it on the installer app. Please note that this company key is unique to each company.
          • Enter the Company Key you see into the Installer App when prompted to proceed.
                           

                      Once you've entered the company key, select “Install."
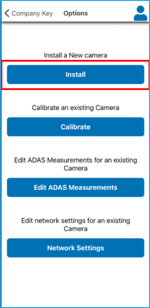
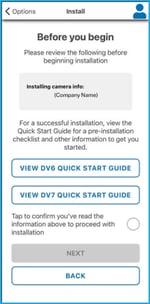
                      3. Begin a New DV6/DV7 Installation

                      • Click “View DV6/DV7 Quick Start Guide” to review the pre-installation checklist and key information to help you get started.

                      • Install the device in your vehicle by following the instructions provided in the Quick Start Guide. 
                                                                                

                          4. Prepare the Vehicle & Power the Camera

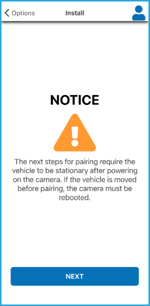
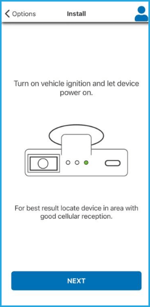
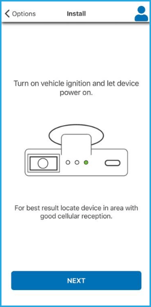
                          • Ensure the vehicle is stationary and parked in an area with strong cellular reception.
                          • Turn ON the vehicle ignition to power the camera.
                          • The camera will go through a firmware update procedure if it is not on the latest version. This process involves two reboots. Once a solid green light is present for more than 15 seconds, it is safe to proceed to the pairing process.
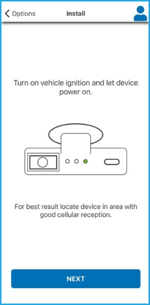
                                 

                                🔔 Important: Do not move the vehicle during this process. If the vehicle is moved before pairing, the camera will reboot and the installation procedure will need to be restarted.

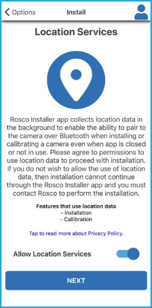
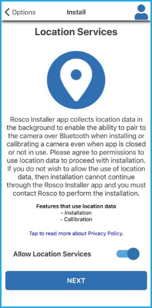
                                5. Enable Location Services

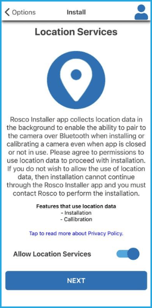
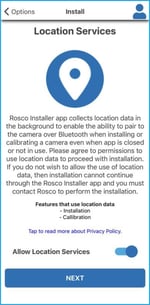
                                • You will now be prompted to enable location permissions for the Installer App.
                                • Important: If you skip this step, installation cannot proceed, and you may need Rosco support to complete the process.
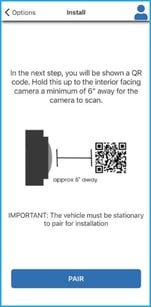
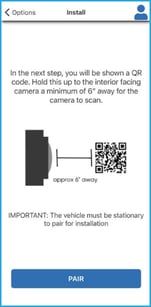
                                    6. Pair the Camera Using QR Code

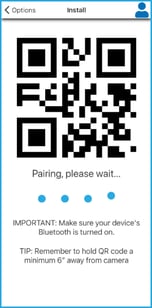
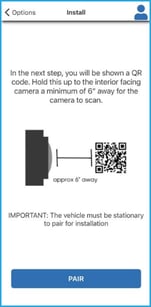
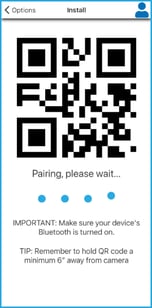
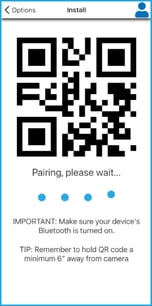
                                          • Hold the QR code on your mobile device and point it toward the interior-facing camera about 6 inches away from the camera.
                                          • Make sure Bluetooth is enabled on your phone, and the vehicle remains stationary during this step.
                                          • Once pairing is successful, you’ll see the camera’s network settings. You may edit them or proceed with them as necessary.

                                                Note: After pairing is complete, the camera type will display the camera model (DV6/DV7), based on which camera is paired.
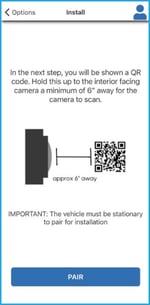
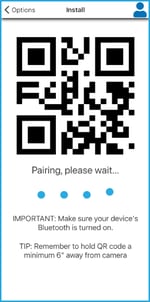
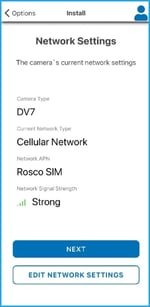
                                                     

                                                 Note: if the camera has trouble scanning the QR code, try these 3 troubleshooting fixes:

                                                • Sign out of the app, reboot the camera by disconnecting and reconnecting the power cable, and restart the installation.
                                                • If your phone is connected to any other Bluetooth devices (headphones, vehicle speaker, etc.), disconnect those devices and try again.
                                                • If the sun is directly in front of the vehicle’s windshield, the glare may be making it hard for the DV to see the QR code. Use your hand or another object as a shade behind the camera to reduce the glare.

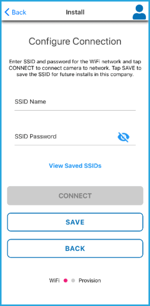
                                                  Edit Network Settings

                                                  If the network signal strength is weak, you can adjust the network settings from the Installer App.

                                                  1. Open the Network Settings page.
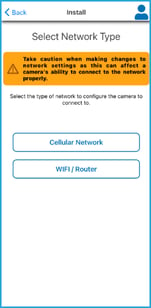
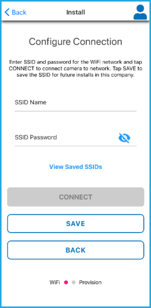
                                                  2. Select the network type — either Cellular or Wi-Fi.
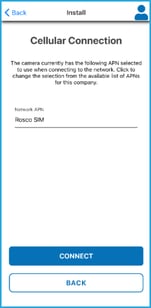
                                                  3. Under the Cellular option, you’ll see a list of available APN (Access Point Name) configurations.
                                                  4.  Please note that the Canadian customers with a Bell SIM card do not need to use an APN for cellular connectivity; they can connect through the “Rosco SIM” network.  

                                                        If you’re using a custom SIM card (BYOD SIM) or an AT&T SIM card for 4G connectivity on the DV6, please contact Rosco Tech Support. They will ensure the correct APN configuration is added to your company profile in RoscoLive, so that you can select the appropriate APN from the dropdown menu in the Installer App during setup.

                                                        Note: If the Signal Strength doesn’t appear or shows “Not Connected” after you confirm you have the right SIM card and relevant or No APN, please edit the Network settings, connect to Rosco SIM, and follow the app instructions to make sure the signal strength shows connected in “Network Settings” page.

                                                        IMPORTANT: Use the Wi-Fi/Router option only when the vehicle the camera is being installed on has an on-board router and a strong enough signal to connect to RoscoLive. Otherwise, please use the Cellular Network option only.

                                                        A weak network signal may interfere with the successful installation of the device and with connecting to RoscoLive after the installation is complete.
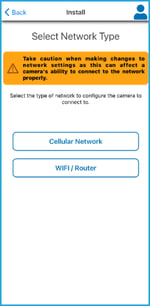
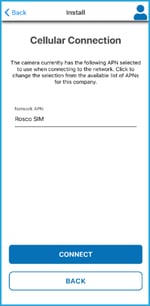
                                                                                     

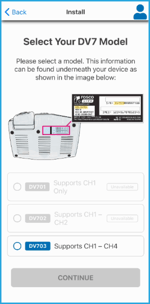
                                                        7a. Other Device Information for DV7 

                                                        If installing a DV6, proceed to 7b

                                                        • Select your DV7 model. If you don’t know which model you have, use the diagram on the app to determine.
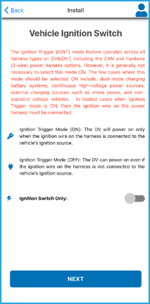
                                                        • Turn on the “ignition switch only” if you like the DV to power on with the ignition, regardless of voltage.
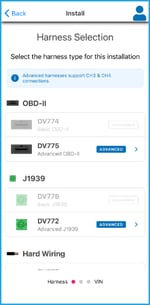
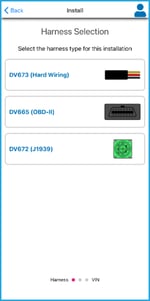
                                                        • Select the harness type based on your installation.
                                                          • The “Advanced” harnesses support CH3 and CH4 aux cameras. The “Basic” harnesses do not.
                                                                                 

                                                        7b. Other Device Information for DV6 
                                                                                                     

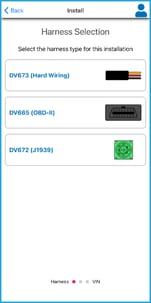
                                                        In the next step, choose the appropriate CAN connection (vehicle communication protocol) to continue


                                                        7c. Vehicle Info (DV6 and DV7)

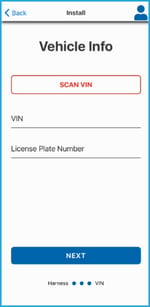
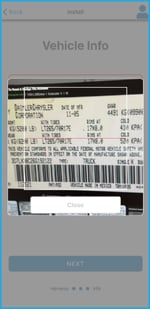
                                                        Enter the vehicle’s VIN number and License Plate Number in the given fields. Use the “SCAN VIN” button if your vehicle has a barcode that can be scanned.
                                                                                                     

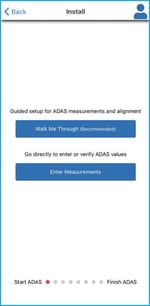
                                                        8. Perform ADAS Calibration Measurements:

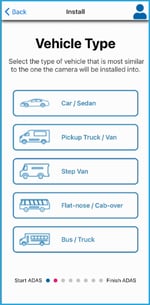
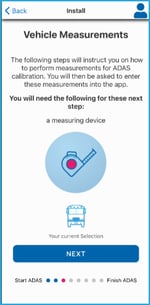
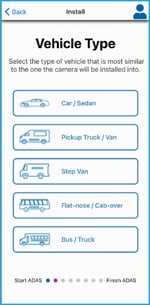
                                                        Prepare a measuring tape, select the vehicle type and follow on-screen instructions to complete the process.

                                                        Note:

                                                        • Walk Me Through guides you through the entire calibration process step by step - ideal for first-time installations.
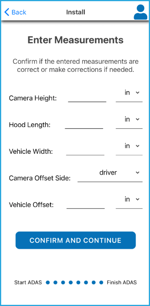
                                                        • Enter Measurements skips directly to the measurement entry page for quick confirmation — best for experienced installers or re-calibrations.
                                                                                                         

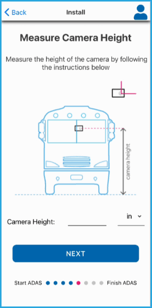
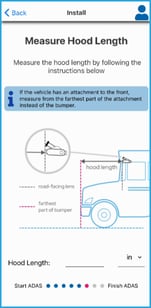
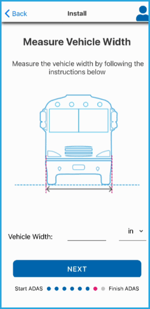
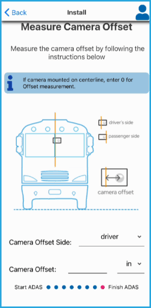
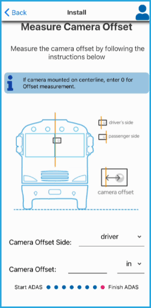
                                                            9. Vehicle Measurements

                                                            First, select the type of vehicle you are installing on, and prepare a measuring instrument.
                                                                                                       

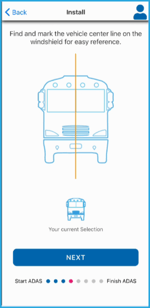
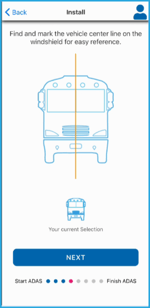
                                                            • Mark the centerline of the vehicle
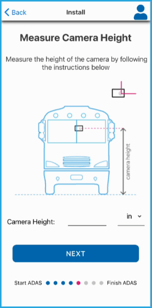
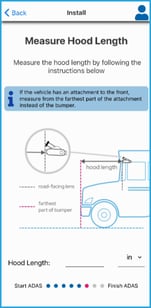
                                                            • Measure:
                                                              • Camera height from the ground
                                                              • Hood length from the windshield to the front bumper
                                                              • Vehicle width (from side to side)


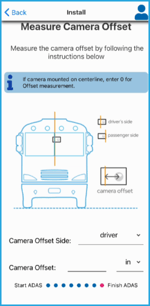
                                                            • If the camera is mounted on the centerline, input 0 for the offset


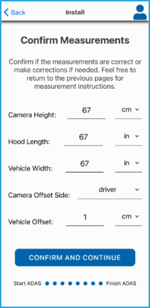
                                                            9. Confirm Calibration Inputs

                                                            Double-check the following:

                                                            • Camera height
                                                            • Hood length
                                                            • Vehicle width
                                                            • Camera offset
                                                            • Vehicle Offset 

                                                            When all values are confirmed, proceed to channel alignment. You will follow the same steps regardless of the vehicle type, whether it is a pick-up truck, step van, flat nose, cab over or a bus.


                                                            In the next steps, adjust the camera angles and follow the instructions to align the camera view for all channels before proceeding.

                                                            10. Align Camera Channels

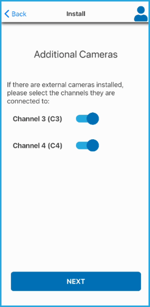
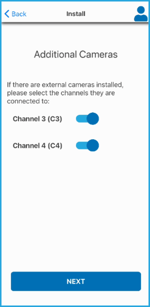
                                                            First, toggle Channels 3 and/or 4 if you have additional cameras connected.

                                                            Note: DV6 is limited to 3 channels, and DV7 is limited to 4 channels.  


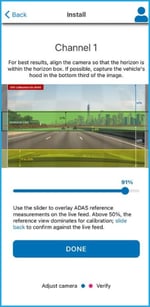
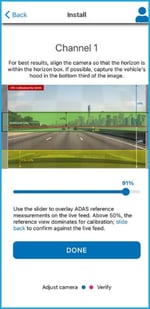
                                                            • Channel 1 (Road-facing):
                                                              • Use the reference image overlay to align the camera view during installation.
                                                              • Adjust the slider until the live camera feed matches the reference overlay.
                                                              • Ensure the horizon aligns with the center of the horizon box.
                                                              • The vehicle hood should appear in the bottom third of the frame.
                                                              • Once properly aligned, save the calibration to confirm the setup.


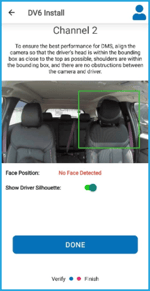
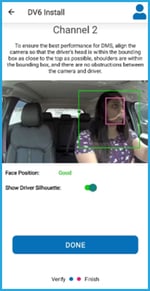
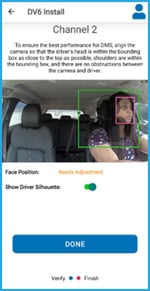
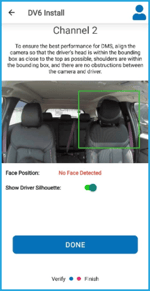
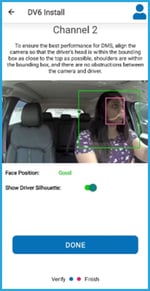
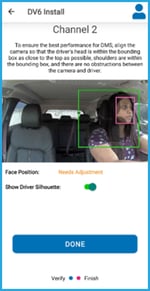
                                                            • Channel 2 (Driver-facing):
                                                              • Ensure the driver's head is within the bounding box, near the top
                                                              • Shoulders should also be visible and unobstructed 

                                                                  For 2-channel configuration"


                                                                  Channels 3 and 4:
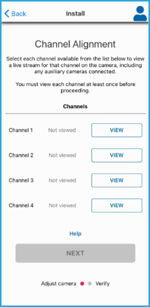
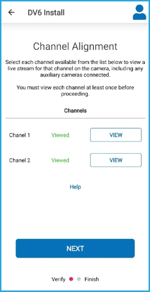
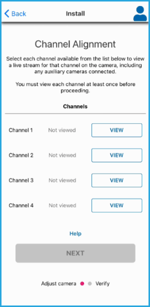
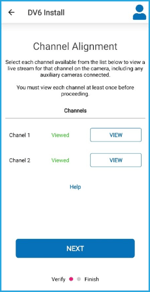
                                                                  • If using channel 3 and/or 4 cameras, view the camera view to confirm the view is as expected and adjust if needed.
                                                                  • You must view each channel at least once before proceeding.

                                                                      11. Upload Required Installation Photos

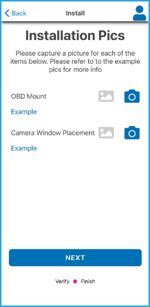
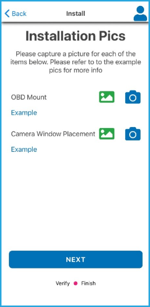
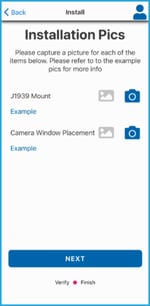
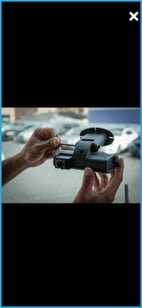
                                                                      Once the channel alignment is complete, proceed to the next step to capture a photo of the Camera Window placement along with the harness mount installations.

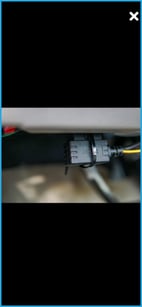
                                                                      For DV665/DV775 Harnesses (OBD-II):

                                                                      You will be prompted to capture or upload:

                                                                      • Camera Window Placement
                                                                      • OBD Mount

                                                                          Reference example images on-screen before capturing your own. 


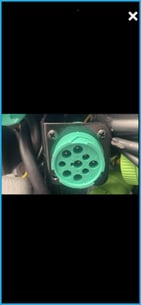
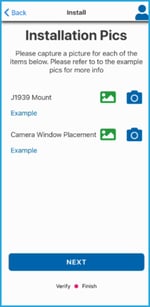
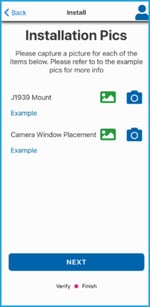
                                                                          For DV672/DV772 Harnesses (J1939):

                                                                          You will be prompted to capture and upload:

                                                                          • Camera Window Placement
                                                                          • J1939 Mount

                                                                              Reference example images on-screen before capturing your own.


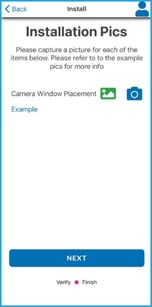
                                                                              For DV673/DV778 Harnesses (Hard Wiring):

                                                                              For Hardwire Installations, you will be prompted to capture a photo of the Camera Window placement. You can either use the camera icon to take a photo directly or upload an existing image. Please review the example images on-screen before capturing your own.


                                                                              12. Finalize Setup & Complete Installation

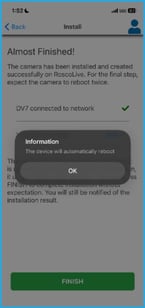
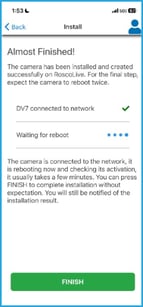
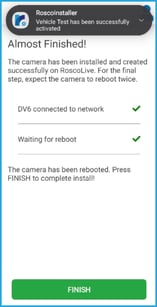
                                                                              • After saving your images, the DV6/DV7 camera will reboot twice to complete configuration.
                                                                              • Once both checkmarks appear—DV6/DV7 Connected to Network and Waiting for Reboot—tap Finish to complete the setup.
                                                                              • A notification will confirm the success of the installation.


                                                                                    Important Note:

                                                                                    • If there are any issues during installation, a check mark will not appear next to the affected item on the final screen shown above.
                                                                                    • If both check marks are visible but the device does not appear online on RoscoLive after installation, please contact Rosco’s Tech Support team.
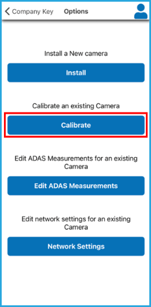
                                                                                    • To recalibrate any camera channels on your installed device, navigate to the Calibration menu. This will guide you through the recalibration process step by step.
                                                                                    • The Network Settings menu allows you to update the device’s network configuration. This is especially useful if you've changed the SIM card or network provider on the device.

                                                                                    Calibration:

                                                                                    To calibrate an existing camera, select Calibrate from the Options screen.

                                                                                    Follow the instructions to pair the device the same way as the installation.

                                                                                    • Ensure the vehicle is stationary and parked in an area with strong cellular reception.
                                                                                    • Turn ON the vehicle ignition to power the camera.

                                                                                        Enable Location Services


                                                                                        Pair the Camera Using QR Code


                                                                                        Follow the instructions to calibrate the device the same way as the installation.

                                                                                        First, toggle Channels 3 and/or 4 if you have additional cameras connected.

                                                                                        Note: DV6 is limited to 3 channels, and DV7 is limited to 4 channels.


                                                                                        •  Channel 1 (Road-facing):

                                                                                        • Channel 2 (Driver-facing):


                                                                                                Channels 3 and 4:
                                                                                                • If using channel 3 and/or 4 cameras, view the camera view to confirm the view is as expected and adjust if needed.
                                                                                                • You must view each channel at least once before proceeding.

                                                                                                      Edit ADAS Measurements:

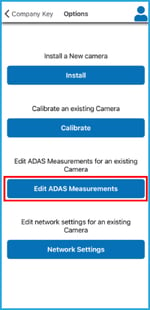
                                                                                                      To edit ADAS measurements for an existing camera, select Edit ADAS Measurements from the Options screen.

                                                                                                      Follow the instructions to pair the device the same way as the installation.

                                                                                                      • Ensure the vehicle is stationary and parked in an area with strong cellular reception.
                                                                                                      • Turn ON the vehicle ignition to power the camera.


                                                                                                          Enable Location Services


                                                                                                          Pair the Camera Using QR Code


                                                                                                          Follow the instructions to edit the ADAS measurements the same way as the installation.

                                                                                                          First, select the type of vehicle you are installing on, and prepare a measuring instrument.
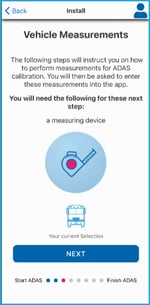
                                                                                                           

                                                                                                          • Mark the centerline of the vehicle
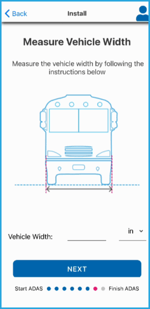
                                                                                                          • Measure:
                                                                                                            • Camera height from the ground
                                                                                                            • Hood length from the windshield to the front bumper
                                                                                                            • Vehicle width (from side to side)


                                                                                                                    •  If the camera is mounted on the centerline, input 0 for the offset  
                                                                                                                                                                          

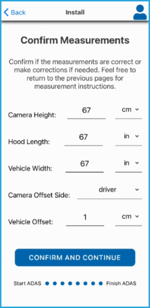
                                                                                                                    9. Confirm Calibration Inputs

                                                                                                                    Double-check the following:

                                                                                                                    • Camera height
                                                                                                                    • Hood length
                                                                                                                    • Vehicle width
                                                                                                                    • Camera offset
                                                                                                                    • Vehicle offset

                                                                                                                              When all values are confirmed, proceed to channel alignment. You will follow the same steps regardless of the vehicle type, whether it is a pick-up truck, step van, flat nose, cab over or a bus.
                                                                                                                                                                                                

                                                                                                                              Edit Network Settings:

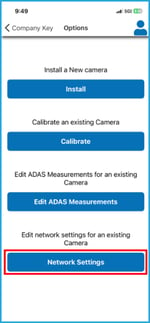
                                                                                                                              To edit Network Settings for an existing camera, select Network Settings from the Options screen.

                                                                                                                              Follow the instructions to pair the device the same way as the installation.

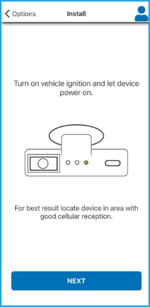
                                                                                                                              • Ensure the vehicle is stationary and parked in an area with strong cellular reception.
                                                                                                                              • Turn ON the vehicle ignition to power the camera.
                                                                                                                                  Enable Location Services
                                                                                                                                  Pair the Camera Using QR Code
                                                                                                                                   

                                                                                                                                  Follow the instructions to edit the Network Settings the same way as the installation.
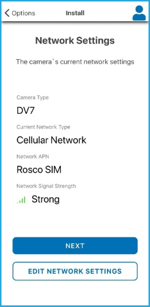
                                                                                                                                  Edit Network Settings

                                                                                                                                  If the network signal strength is weak, you can adjust the network settings from the Installer App.

                                                                                                                                  1. Open the Network Settings page.
                                                                                                                                  2. Select the network type — either Cellular or Wi-Fi.
                                                                                                                                  3. Under the Cellular option, you’ll see a list of available APN (Access Point Name) configurations.

                                                                                                                                        If you’re using a custom SIM card (BYOD SIM) or an AT&T SIM card for 4G connectivity on the DV6, please contact Rosco Tech Support. They will ensure the correct APN configuration is added to your company profile in RoscoLive, so that you can select the appropriate APN from the dropdown menu in the Installer App during setup.

                                                                                                                                        Note: If the Signal Strength doesn’t appear or shows “Not Connected” after you confirm you have the right SIM card and relevant or No APN, please edit the Network settings, connect to Rosco SIM, and follow the app instructions to make sure the signal strength shows connected in “Network Settings” page.

                                                                                                                                        IMPORTANT: Use the Wi-Fi/Router option only when the vehicle the camera is being installed on has an on-board router and a strong enough signal to connect to RoscoLive. Otherwise, please use the Cellular Network option only.

                                                                                                                                        A weak network signal may interfere with the successful installation of the device and with connecting to RoscoLive after the installation is complete.